How to use the scanner in Ma426
In the Linux laboratory Ma426 there is a scanner connected to the computer switch. The following is a short introduction on how to use these items to scan a picture into the computer. To use the scanner, it is necessary to be logged onto the console of switch.

Single pages / ordinary scanning
If it is desired to scan an image with preprocessing and with the
aid of a window-based system, two methods are recommended.
The first is with xsane, a program only for
scanning images. The second is with Gimp, a more
advanced program for image processing, etc. For
quick-and-dirty processing, xsane is recommended,
while Gimp may be the best choice if the image is
to be manipulated afterwards.
xsane
Start xsane by issuing xsane at a command
prompt.
 When
When xsane is started for the first time, a
license agreement (GPL) is offered. It has no legal effect
in Sweden; just click on Accept to start the
program.
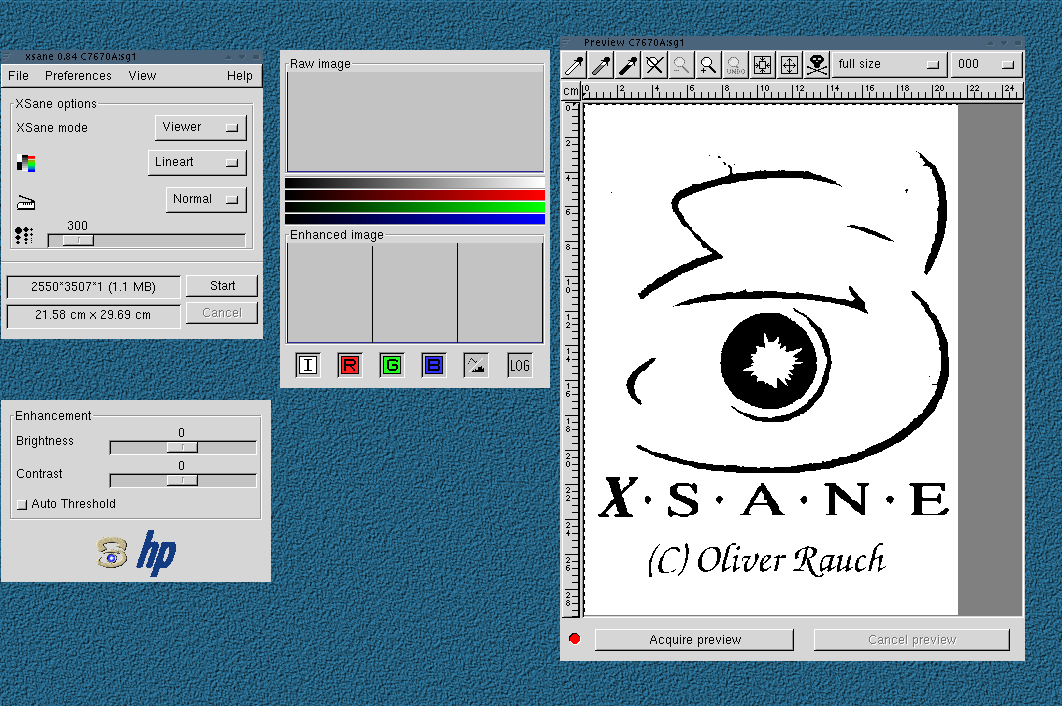 When the application starts, four windows are displayed: Preview, histogram, xsane
och standard options.
When the application starts, four windows are displayed: Preview, histogram, xsane
och standard options.
- Preview
- This window is used to obtain a preliminary image of that which lies on the bed of the scanner, in order to select which area will be scanned, etc.
- Histogram
- This provide a histogram over the use of color in the picture, before and after transformation by the program. The ordinary user can ignore this window.
- xsane
- In this window, the main configuration parameters for scanning are entered.
- standard options
- In this window, the basic parameters for scanning, including brightness and contrast, are accessible.
If you are not certain of the function of a button or control, place the mouse cursor over it and after a while a short description will appear.
Scanning in an image
Begin a usual scan by choosing what will be done with the
resulting data. Do this by selecting the Xsane
mode. Choose Viewer if you want only read it in
order to view it in a program, and Save if you want to
save it to disk.
Next, select how the image will be read in; color, black-and-white,
greyscale, etc. Place the document or picture in the scanner (by lifting the
paper feeder) onto the glass; align it with an edge. Next, press the
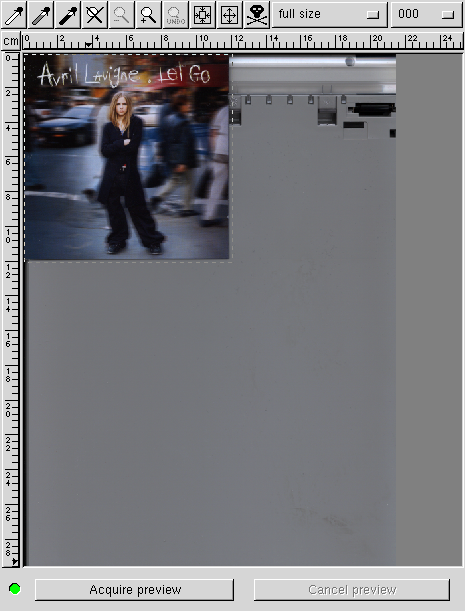
button Acquire preview in the Preview window.
This causes a preliminary image to be scanned in the
position chosen and displayed in the Preview window.
Now choose the the region of the document or image which is to be read in. To do this, mark the region with the mouse. Press and hold the left mouse button while at one corner, and drag the cursor to the opposite corner. That will create a pane as shown in the example to the right. This is the region which will be scanned in.
Choose the file name under which the image will be saved using the
xsane window next to the little diskette icon. Give the
entire name or click on the diskette to chose a name. In the menu
Type, choose the type of file to be saved, or type the
entire file name, including an extension to identify the type (for
example, bosse.jpeg will be saved in JPEG-format).
Next, choose the resolution to be used, in dpi (dots per inch), by
selecting the uppermost choice (Set scan
resolution). This scanner has a maximum resolution of 1200 dpi.
Note that after making this selection, the size of the image in the
lower part of the window is changed to reflect this choice. The raw
size of the data is also given (which may be much larger than the
final result if a compressed format such as JPEG will be used). It is
best to choose even values, such as 200, 400, or 800 dpi; otherwise
the scanner may need to sweep back and forth many times to scan the
image properly.
At first, you can ignore the other settings. If the image is too
light, too dark, too flat, etc., experiment with the settings
Set gamma value, Set brightness, Set
contrast and examine the different results.
Press Start to scan in the image.
Gimp
Gimp - GNU Image Manipulation Program is an advanced image-processing program. This information covers only how to scan images using Gimp. For more information on how to use the program, use the built-in help system or consult Gimp's website.
Gimp must
install files in your home directory to function well. Read the
instructions on the screen and follow them. You will be prompted for a
location for the Swapfile. Choose /tmp and
not in your home directory as the program suggests. This file can be
quite large and is used intensively; therefore it is best to store it
locally and not in your home directory, which must accessed over the
network. Also, to achieve good results, ask Gimp to read
the monitor resolution from the system.
Once in Gimp, enter the File menu and
choose Acquire, XSane, plustek:'dev'usb'scanner0. This
starts the same scanner interface as in xsane. Follow
the instructions under xsane above, with the exception
that you cannot choose what to do with the image. After being scanned
in, it opens automatically in Gimp and may be processed
as you wish.
Good luck!